You might be surprised how often users post on Microsoft’s support forum about how they can recover accidentally deleted files. Many users ask the gurus at Microsoft if there’s any way they can retrieve files that have been deleted. Some users might empty the Recycle Bin before realizing it includes deleted files they need. Users can erase an image files without even noticing how. Windows 10’s Storage Sense utility, which automatically erase files, might can also erase some downloaded files users need to retain.
When you delete files, they’re not always completely erased. Most users are probably aware that ‘deleted’ files can end up in Windows’ Recycle Bin. Thus, that’s an obvious first place to look to recover deleted files from. However, you can still recover deleted files that aren’t lying in the Recycle Bin. When you’ve erased a file on a hard disk drive, the OS only initially removes the pointer reference for it. File Explorer in Windows shows the space a deleted file occupied on a hard drive as freely available. However, the file remains intact until the HDD space it occupies gets overwritten.
There are myriad data recovery software packages for Windows, and other platforms, that can restore deleted HDD files that haven’t been overwritten. Users who haven’t taken any file backup precautions will usually need to recover erased files with a data recovery utility. So, Microsoft’s forum agents or moderators often tell users who need to recover deleted files to install and utilize a third-party data recovery utility (or perhaps the big M’s Windows File Recovery app).
Not all data recovery software packages are freely available (in fact, most probably aren’t). However, there are a few freeware utilities you can restore lost files with. PhotoRec is one of the better freely available software solutions for data recovery you can utilize on all Windows platforms dating back to 2000. Check our PhotoRec review below.
Part 1: What is PhotoRec?
PhotoRec (or TestDisk & PhotoRec) is a data recovery software package that’s freely available without any kind of usage restriction. So, it doesn’t have any kind of restricted demo version. PhotoRec is full-fledged data recovery software that you can recover any volume of deleted files with.
The PhotoRec download comes with an additional TestDisk utility. That’s a separate tool with which you can recover lost drive partitions. TestDisk can also fix file system errors.
PhotoRec is the software you’ll need for file recovery. That software has alternative command-line and GUI (Graphical User Interface) versions you can restore deleted files with. The command-line PhotoRec is a menu version you utilize with the keyboard. This is how to utilize both PhotoRec’s alternative versions.
Part 2: How to use PhotoRec?
How to Use PhotoRec Command Line Version
1. Download and Extract PhotoRec’s ZIP
Step 1: Open the TestDisk & PhotoRec Softpedia webpage in a browser.
Step 2: Click the “Download Now” button, and select either the External Mirror x86 or x64 option. The x86 option is for the 32-bit version.
Step 3: Open File Explorer by clicking its taskbar button of by pressing the Windows key + E hotkey.
Step 4: Open the folder that includes the TestDisk & PhotoRec ZIP.
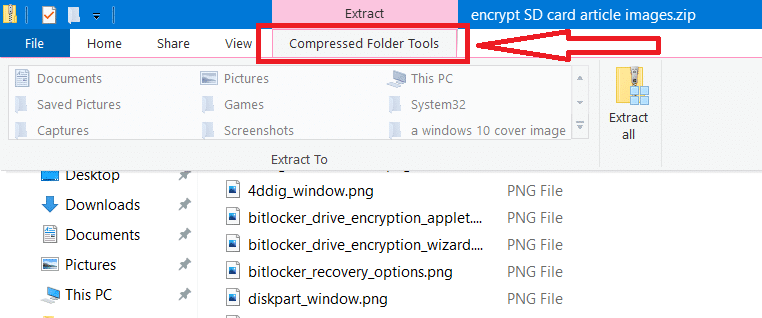
Step 5: Click the testdisk-7.2-WIP.win64.zip to open it.
Step 6: Select the Compressed Folder Tools tab shown in the snapshot directly below.
Step 7: Click “Extract all” to open the Extract Compressed (Zipped) Folders window.
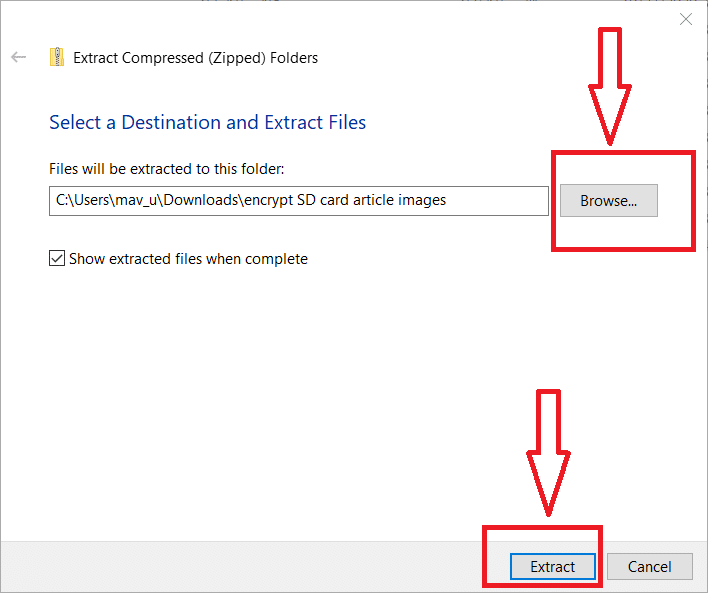
Step 8: Click “Browse” to select a folder for the extracted ZIP file.
Step 9: Press the “Select Folder” button on the Select a destination window.
Step 10: Then press the “Extract” button.
Step 11: Open the extracted testdisk-7.2-WIP folder.
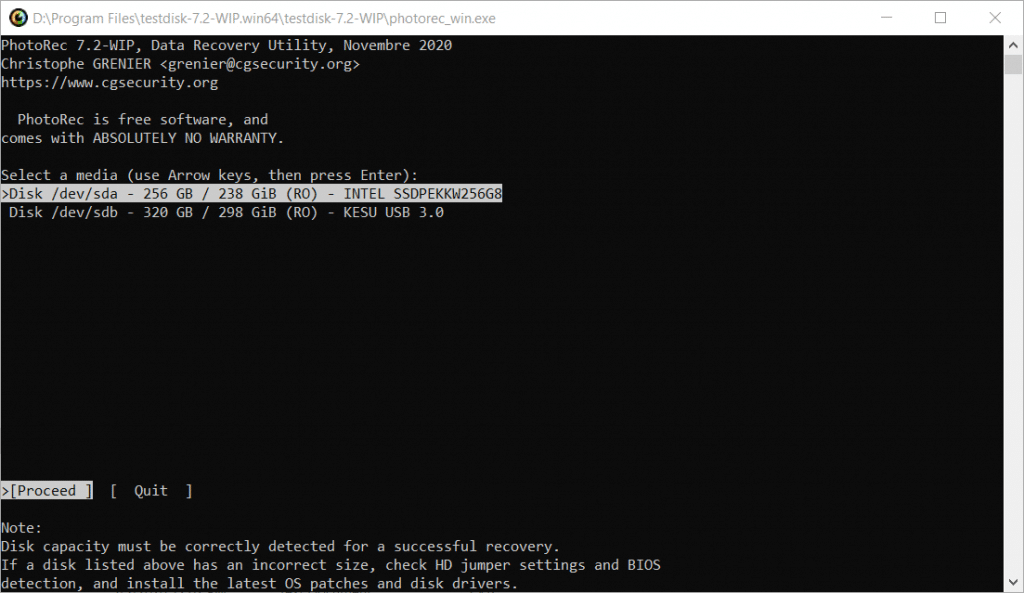
Step 12: Finally, right-click photorec_win.exe and select “Run as administrator” to open the PhotoRec window shown directly below.
2. Recover Files With PhotoRec
Here is how to use PhotoRec recover some deleted files.
Step 1: First, select a listed drive to recover files on with the arrow keyboard keys and press Enter.
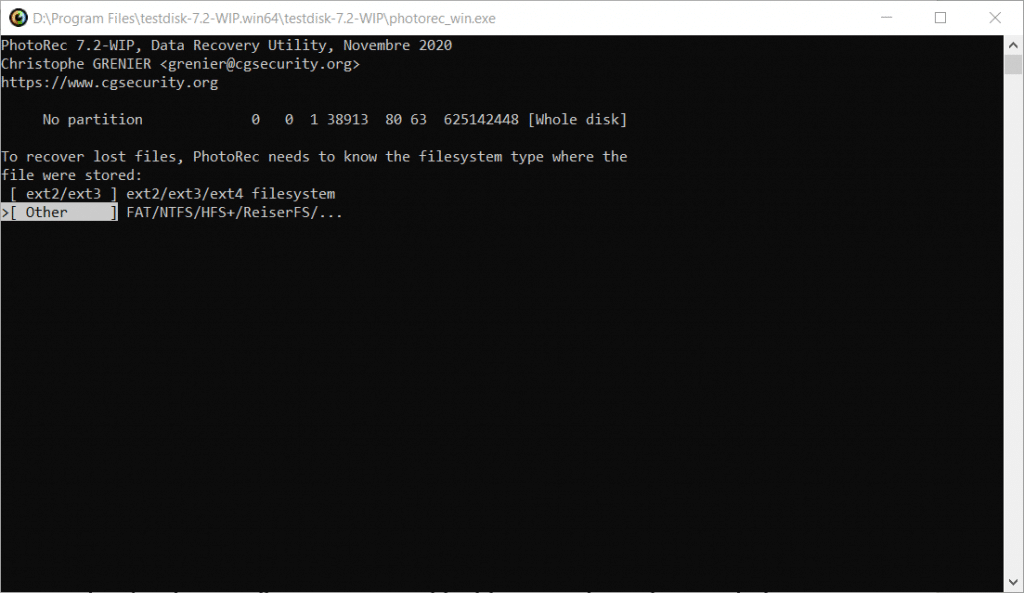
Step 2: Then select the “No partition [Whole disk]” option, and press the Enter key (with the “Proceed” option selected).
Step 3: Select either the “[ext2/ext3]” or “[Other]” option depending on your selected drive’s file system type. Most users will probably need to select the “[Other]” option for FAT and NTFS file system types.
Step 4: Next, select a folder directory to save the recovered files to. Press the C key when you’ve selected a suitable folder to save the recovered files in.
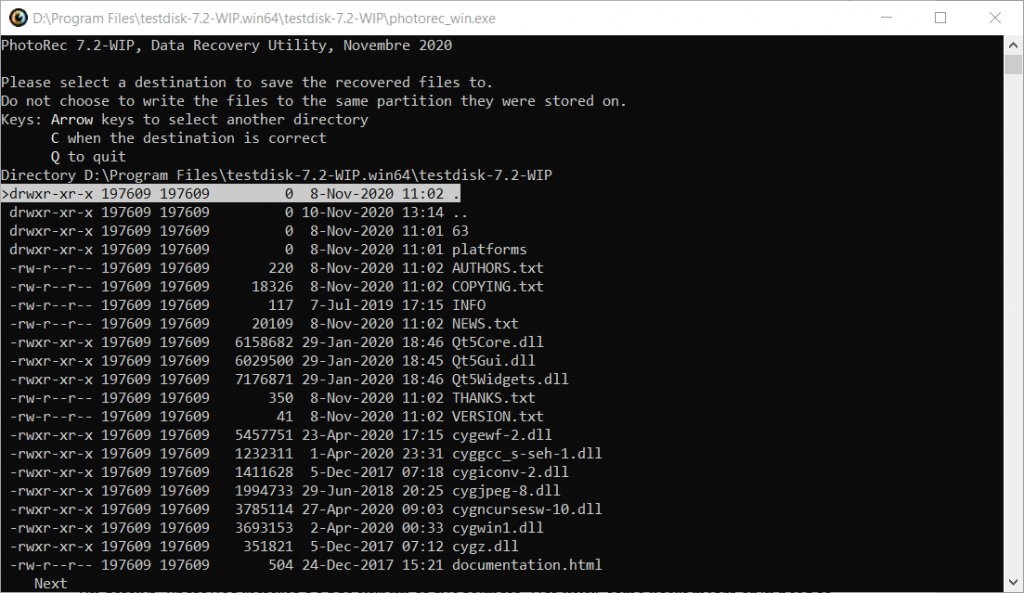
Thereafter, PhotoRec will start recovering any deleted data it can. When it’s done, open the directory you selected to save the restored files in. You’ll find the restored files in a recup_dir.1 subfolder.
3. Configure PhotoRec’s Scanning
By default, PhotoRec restores a wide variety of file formats. However, some users might only need to recover files of a specific format. For example, users who need to recover lost photo files might only need to restore JPEG and PNG images. You can configure PhotoRec to only recover files of one specific format as follows.
Step 1: Choose a drive to recover files from.
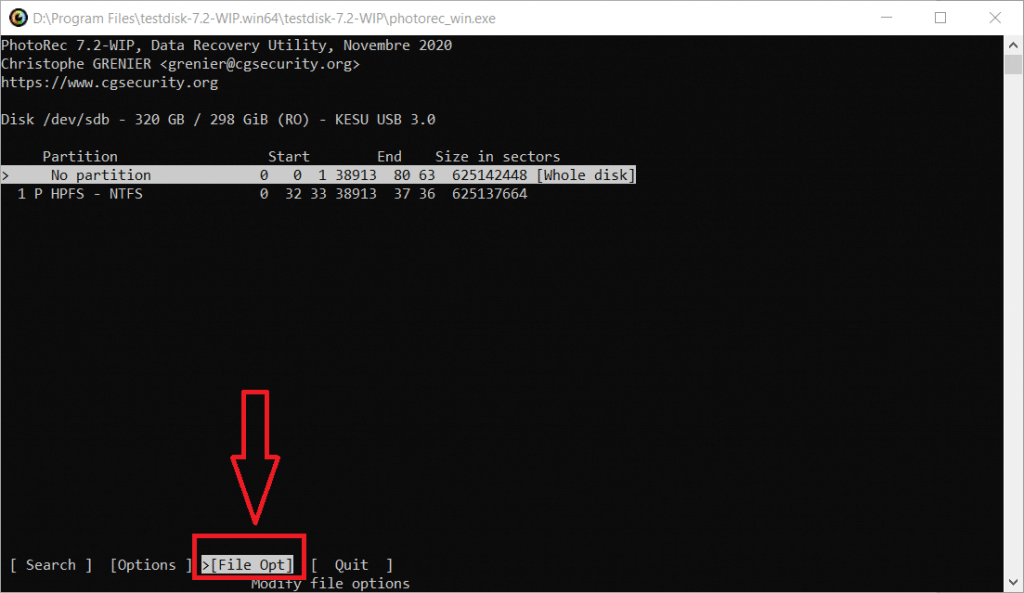
Step 2: Then select the “[File Opt]” menu option on the partition options menu shown directly below. To do that, you’ll need to press the right arrow key twice and hit Enter.
Step 3: Selecting “[File Opt]” will open the file format list in the snapshot directly below. To deselect all the selected file formats, press the S keyboard key.
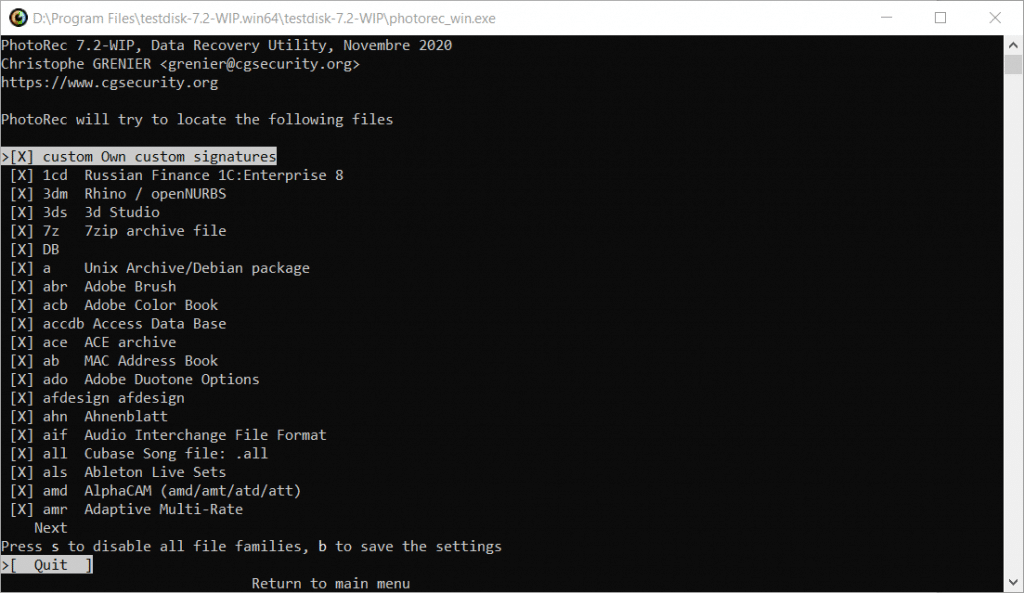
Step 4: Then select a specific file format to recover with the up and down arrow keys. You’ll need to press the Space key to select a highlighted format.
Step 5: To save the file format settings, press the B keyboard key. Press the Enter key to confirm.
Step 6: Thereafter, press the Enter key to return to the partition selection menu.
Step 7: Select the “[Search]” option with the keyboard.
Step 8: Then proceed as outlined for steps two, three, and four of the recovering files with PhotoRec guidelines. So, select the “Whole disk” option, a file system type, and then an output folder to save restored files in.
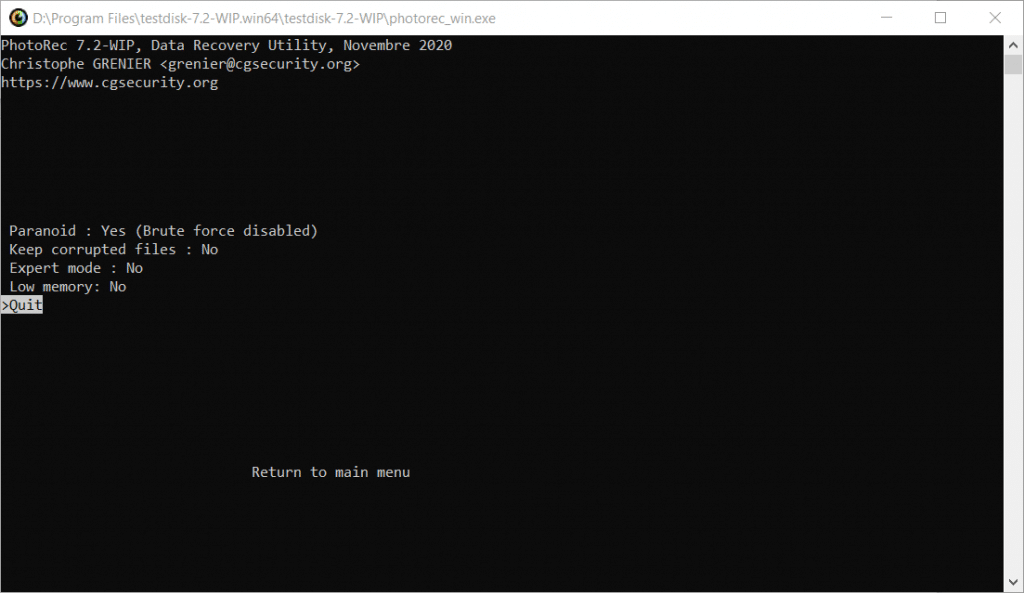
You can also select “[Options]” on the partition menu to open the settings shown directly below. There you can turn on an “[Expert mode]” option that enables you to modify disk geometry. If for some reason you prefer to keep corrupted files, toggle the “Keep corrupted files” setting on.
How to Use PhotoRec GUI Version (QPhotoRec)
Some users might prefer to utilize the GUI (graphical) version of PhotoRec with a mouse instead of navigating menus with keyboards. Here is how to how to use PhotoRec GUI version steps.
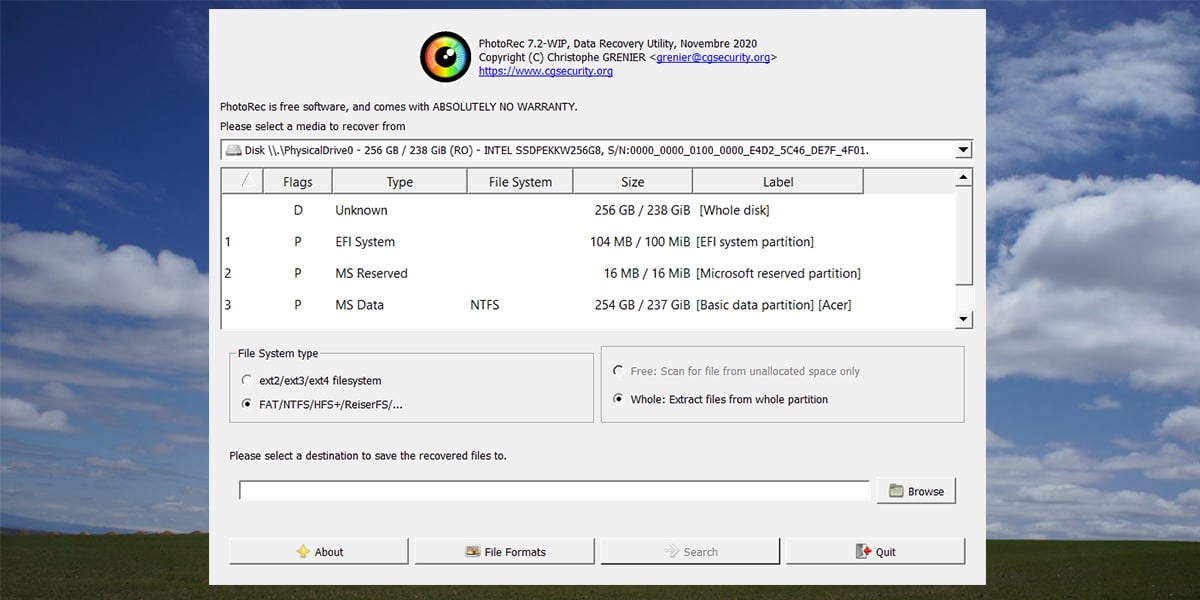
Step 1: Right-click qphotorec_win.exe in the testdisk folder and select “Run as administrator” to open the window directly below.
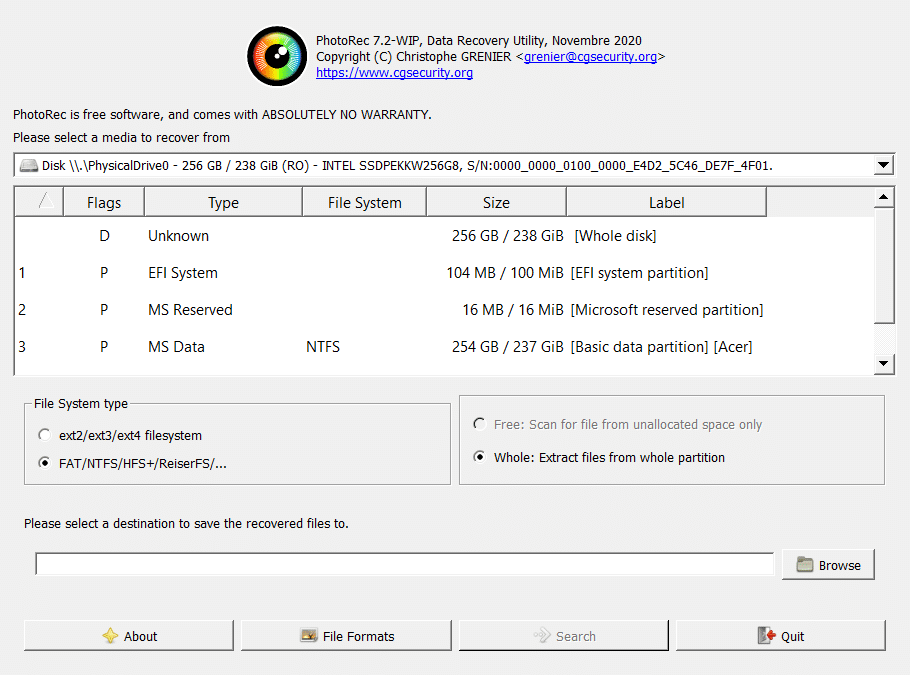
Step 2: Your C: drive will be selected by default. You can click the drop-down menu at the top of QPhotoRec’s window to select an alternative drive to recover data from.
Step 3: Select “No partition [Whole disk]” on the window.
Step 4: Select the “FAT/NTFS/HFS” or “ext2/ext3/ext4” file system option depending on your selected drive’s file system type.
Step 5: Click “Browse” to open a Please select a destination window.
Step 6: Select a folder to save recovered files to.
Step 7: Click the “Select Folder” option.
Step 8: To select more specific formats to recover, click the “File Formats” button.

Step 9: Click “Reset” to deselect all selected format checkboxes.
Step 10: Select the formats for files you need to restore.
Step 11: Press the “OK” button to exit the file format window.
Step 12: Click “Search” to restore deleted files with PhotoRec.
Part 3: Best Alternative of PhotoRec – Tenorshare 4DDig
PhotoRec is a pretty good freeware data recovery tool, but there are decent alternatives. Tenorshare 4DDig, for Windows 10/8.1/8/7, is among the best alternative data recovery utilities, which you can restore more than 1,000 deleted file formats with. This software can restore lost data on HDD and SSD drives, USB sticks, SD cards, and even DVDs.
4DDig has a better UI design than QPhotoRec. However, the biggest difference between those software packages is that 4DDiG displays a preview window after scanning from which users can select specific files to recover. PhotoRec will just recover all the files it can restore for selected formats in a folder without providing any preview. And 4DDig is quite easier to use than PhotoRec.
Another notable difference is that PhotoRec users can’t select to recover data from a specific folder path. However, Tenorshare 4DDig users can click a “Choose location” option to select e a more specific folder to recover files from. So, 4DDig is a more flexible data recovery utility than PhotoRec.
So 4DDig is the best PhotoRec alternative. However, 4DDig isn’t freeware software. Tenorshare 4DDig Standard is currently retailing at a discounted $49.99 on the publisher’s website. This best Windows data recovery software has a trial version you can recover up to one gigabyte of data with (albeit with a maximum 25-megabyte file size restriction). You might be able to retrieve the deleted files you need to with that trial package as follows.
Step 1: Click the “First 1 GB Free” button on 4DDig’s webpage.
Step 2: Install Tenorshare 4DDig with the downloaded setup wizard.
Step 3: Open the 4DDig software window shown in the screenshot directly below.
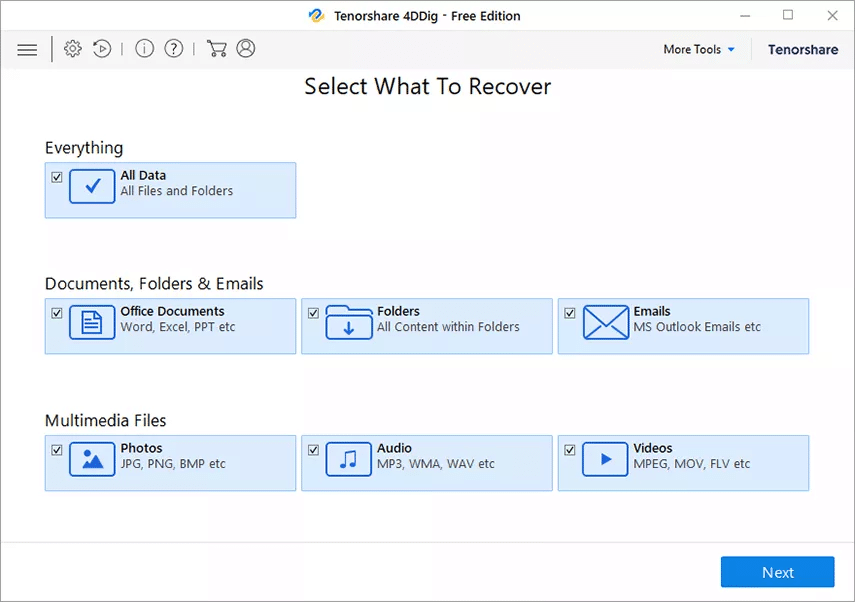
Step 4: Select the “All Data” checkbox to restore all file formats the software supports. Or select one of the options for image, sound, video, and email file types if you need to recover files with more specific formats.
Step 5: Click “Next” to proceed.
Step 6: Select a local drive to restore data on.
Step 7: Press the “Scan” button. When the scanning is complete, 4DDig will display the files it can recover as in the shot directly below.
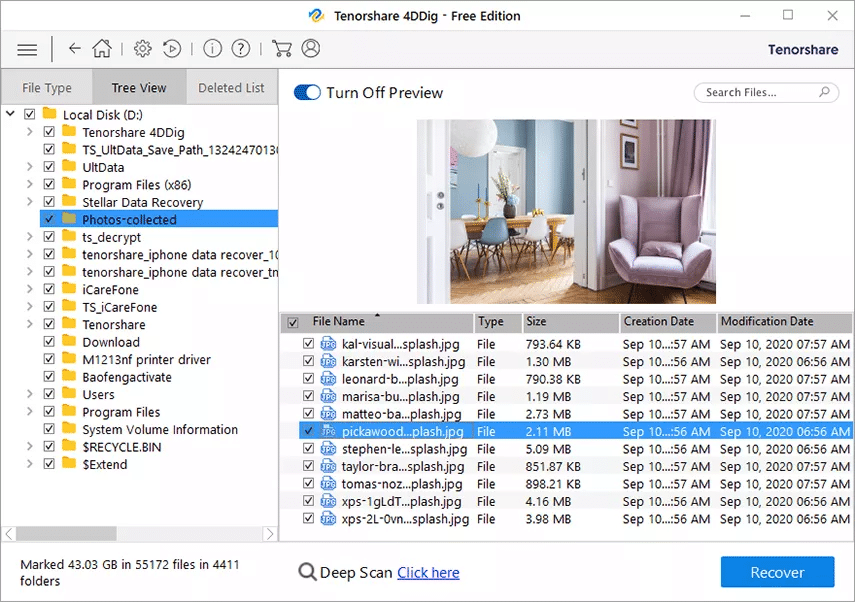
Step 8: Next, select some files to recover on the Tree View or File Type tabs.
Step 9: Click “Recover” to open a Recover window.
Step 10: Press the “Browse” option to select a folder to save the restored files in.
Step 11: Finally, press the “Start Saving” button.
Conclusion
That’s how to use PhotoRec and PhotoRec alternative-Tenorshare 4DDig to recover your deleted files. PhotoRec is an entirely adequate tool for recovering erased files but it is kind of complicated. So, some users might prefer to utilize 4DDig. They can scan specific folders and select what files to restore. Tenorshare 4DDig’s “Deep Scan” option also enhances its data recovery rate, which probably makes it more reliable file restoration software than PhotoRec.